# Pico2W DualSense 5 Bridge — OLED Edition
[中文](./README.CN.md)
> Turn a Raspberry Pi Pico2W into a wireless adapter for the DualSense (DS5) controller — with an optional on-board status display.
> **OLED Edition** is a fork of **[awalol/DS5Dongle](https://github.com/awalol/DS5Dongle)** (upstream) that adds an optional Pico-OLED-1.3 128×64 display add-on with 10 screens (status, 4-slot multi-controller pairing, lightbar color picker with favorites and effect presets, trigger test, gyro tilt, touchpad, diagnostics, BT signal strength, audio VU meters, and a persistent settings menu), plus a DS5 button-combo soft-reboot. Upstream is the authoritative source for the core bridge firmware; this fork tracks it and layers add-on features on top.
## Overview
This project enables the Raspberry Pi Pico2W to function as a Bluetooth bridge for the DualSense controller, allowing wireless connectivity with enhanced haptics support.
## Features
**Core bridge (from upstream):**
- Full DualSense connectivity via Pico2W
- HD haptics (advanced vibration feedback)
- Wireless Bluetooth bridging
- Adjustable haptic gain via microphone volume
- Configurable LED and disconnection behaviors
**OLED Edition additions:**
- Optional Pico-OLED-1.3 status display with **10 screens** (status, slots, lightbar, trigger test, gyro tilt, touchpad, diagnostics, RSSI, VU meters, settings)
- **4-slot persistent multi-controller pairing** — bond up to four DualSenses, switch between them from the OLED, slot 0 reconnects automatically on boot
- **Lightbar color picker** with 4 user favorite slots + breathing / rainbow / fade effect presets
- **Persistent settings menu** for the 8 firmware config fields (haptics gain, speaker volume, polling rate, etc.) with hold-to-confirm Reset and Wipe-all-slots actions
- **OLED brightness control + auto-dim** after 5 min idle (extends OLED life)
- **Soft-reboot** without unplugging USB via DS5 `PS + Mute` hold (works headless) or OLED KEY0 double-click
- **Audit pass on the core bridge** — critical stack-overflow fix in the audio path (resolves long-standing "audio stuttering"), security hardening, watchdog, length validation across HID/L2CAP boundaries (see [CHANGELOG.md](./CHANGELOG.md))
## Hardware
### Required
| Item | Notes | Approx. price |
|---|---|---|
| **Raspberry Pi Pico 2 W** | RP2350 MCU with on-board CYW43 Bluetooth/WiFi. [Official product page](https://www.raspberrypi.com/products/raspberry-pi-pico-2/) | ~$7 USD |
| **Sony DualSense Controller** | Any standard PS5 DualSense (VID `054C:0CE6`). | — |
| **USB-C cable** | Connects the Pico 2 W to the host PC. | — |
### Optional (strongly recommended)
| Item | Notes | Approx. price |
|---|---|---|
| **Waveshare Pico-OLED-1.3** | 128×64 SH1107 OLED add-on board (SKU HIPI1798). Plugs directly onto the Pico 2 W headers. Firmware drives it automatically when present and gracefully no-ops when absent. [Product page](https://www.waveshare.com/pico-oled-1.3.htm) · [Wiki](https://www.waveshare.com/wiki/Pico-OLED-1.3) | ~$6 USD |
| **Small heatsink** for the RP2350 | The firmware overclocks the MCU to 320 MHz at 1.20 V (see [Performance / Overclocking](#performance--overclocking)). A small heatsink or thermal pad helps under sustained gameplay. | $1–3 USD |
### Where to buy
Both the Pico 2 W and the Waveshare Pico-OLED-1.3 are widely available worldwide:
- **Adafruit**, **Pimoroni**, **The Pi Hut**, **DigiKey**, **Mouser** — major electronics distributors (US / EU)
- **Waveshare's own store** for the OLED add-on
- Regional **Amazon** storefronts — search `Raspberry Pi Pico 2 W` and `Waveshare Pico-OLED-1.3` (or the SKU `HIPI1798`)
- **AliExpress** — original Waveshare and Pico stock plus clones; check seller ratings
## Getting Started
### Flashing Firmware
1. Hold the BOOTSEL button on the Pico2W
2. Connect the Pico2W to your computer via USB
3. The device will mount as a USB storage device
4. Drag and drop the .uf2 firmware file onto the device
### Pairing the Controller
1. Put the DualSense controller into Bluetooth pairing mode
2. Wait for the Pico2W to detect and connect
3. Once connected, the device will appear on the host system
## Configuration
There are four ways to configure the firmware:
**Web config (recommended, any Chromium-based browser):** open **[DS5 Bridge Config — OLED Edition](https://marcelinevpq.github.io/DS5Dongle-OLED-Config-Web/)** in Chrome, Edge, Vivaldi, Brave, or Opera (Firefox isn't supported — Mozilla declined WebHID). Click **Connect**, pick the DualSense from the browser dialog, and edit any field with a familiar form UI. The page talks directly to the Pico over WebHID — no driver, no install, no data leaves your machine. Source at [MarcelineVPQ/DS5Dongle-OLED-Config-Web](https://github.com/MarcelineVPQ/DS5Dongle-OLED-Config-Web).
**On-device (OLED add-on present):** use the on-screen **Settings** menu (10th screen). D-pad ▲▼ moves selection, ▶◀ adjusts values, △ saves to flash.
**Terminal CLI (any OS, any browser):** install hidapi, then use `scripts/set_ds5.py`:
```bash
pip install hidapi
scripts/set_ds5.py # show current config
scripts/set_ds5.py --auto-haptics fallback # change a field, persist to flash
scripts/set_ds5.py --speaker-volume -10 --haptics-gain 1.5
scripts/set_ds5.py --slot 2 # switch active multi-slot pairing
scripts/set_ds5.py --version # firmware version
scripts/set_ds5.py --rssi # live BT RSSI in dBm
scripts/set_ds5.py --help # full flag list
```
The script talks to the firmware over USB HID feature reports `0xF6`/`0xF7`/`0xF8`/`0xF9` — works on Linux, macOS, and Windows in any terminal regardless of which browser you use. Ported from [loteran/DS5Dongle](https://github.com/loteran/DS5Dongle) and extended for this fork's `current_slot` field.
**DualSense controller buttons (legacy fallback, no OLED, no CLI):**
### Microphone volume
Controls haptic gain multiplier. Range: `[1.0 – 2.0]`.
### Speaker mute
Disables LED connection indicator. Takes effect after controller reconnects.
### Microphone mute
Disables silent disconnection behavior.
## Notes
The Pico device will only be visible to the system after the controller is connected
Some behaviors depend on reconnection cycles to take effect
### Low-battery LED indicator
When the connected DualSense reports its battery at or below 10% (and it is not charging), the Pico onboard LED switches from solid-on to a 1 Hz blink so you can see the warning at a glance. The LED returns to solid-on as soon as the controller is plugged in or its reported level rises again. The blink also fires when `disable_pico_led` is set — the warning is treated as critical and overrides the LED-off preference; the LED returns to its disabled (off) state once the battery recovers or the controller starts charging.
To opt out at build time, configure with `-DENABLE_BATT_LED=OFF`. Default is ON.
## Known Issues
- Overclocking to 320 MHz @ 1.20 V is **required** for stable BT pairing. Dropping voltage to 1.10 V or clock to stock breaks the CYW43 PIO SPI bus and BT stops working. A small heatsink on the RP2350 is recommended for sustained gameplay.
- HD haptics may not fire in every game on Linux + Steam; this is game-side (some titles only send HD-haptic audio under Windows-specific APIs). Tested working in Spider-Man Remastered; not delivered in Ghost of Tsushima — same firmware, same controller.
## Performance / Overclocking
Due to encoding requirements, the Pico2W must be overclocked:
Current settings:
- Voltage: 1.2V
- Frequency: 320 MHz
If your device fails to boot:
- Increase voltage slightly or Reduce CPU frequency
## Build Instructions
To build the project from source:
1. Install Pico SDK 2.2.0 (or later). The build uses `pico_sdk_import.cmake`.
2. **Pin TinyUSB to 0.20.0** inside the Pico SDK (`$PICO_SDK_PATH/lib/tinyusb`). This project's `tusb_config.h` uses the 4-argument form of `TUD_AUDIO_EP_SIZE`, which is not present in the 0.18.0 version that ships bundled with Pico SDK 2.2.0:
```bash
cd "$PICO_SDK_PATH/lib/tinyusb"
git fetch --tags
git checkout 0.20.0
```
3. Configure and build with CMake + Ninja (or Make):
```bash
cd /path/to/DS5Dongle
cmake -S . -B build -G Ninja -DCMAKE_BUILD_TYPE=Release -DPICO_SDK_PATH="$PICO_SDK_PATH"
cmake --build build --target ds5-bridge
```
4. The UF2 lands at `build/ds5-bridge-oled.uf2`. Flash with BOOTSEL as usual.
Build flags worth knowing:
- `-DENABLE_BATT_LED=ON` (default) — blink Pico LED on low DS5 battery.
- `-DENABLE_SERIAL=ON` — route printf to USB CDC for debugging (default OFF; releases UART for production builds).
- `-DPICO_W_BUILD=ON` — build for the original Pico W (drops audio, lowers clock). Default targets Pico 2 W.
## OLED Display Add-on (optional)
If you plug a [Waveshare Pico-OLED-1.3](#hardware) onto the Pico2W's headers, the firmware drives it automatically as a live status display. No configuration needed — the firmware no-ops gracefully when no OLED is present.
### Boot splash (1.5 s on power-on)
```
┌──────────────────────────────┐
│ │
│ DS5 Bridge │
│ Pico2W + OLED │
│ │
└──────────────────────────────┘
```
### Ten screens, cycled with KEY0 on the add-on
Cycle order: **Status → Slots → Lightbar → Trigger Test → Gyro Tilt → Touchpad → Diagnostics → RSSI → VU Meters → Settings →** wrap. KEY0 short-press steps forward. KEY1 short-press steps backward (with two contextual exceptions, see the table at the end).
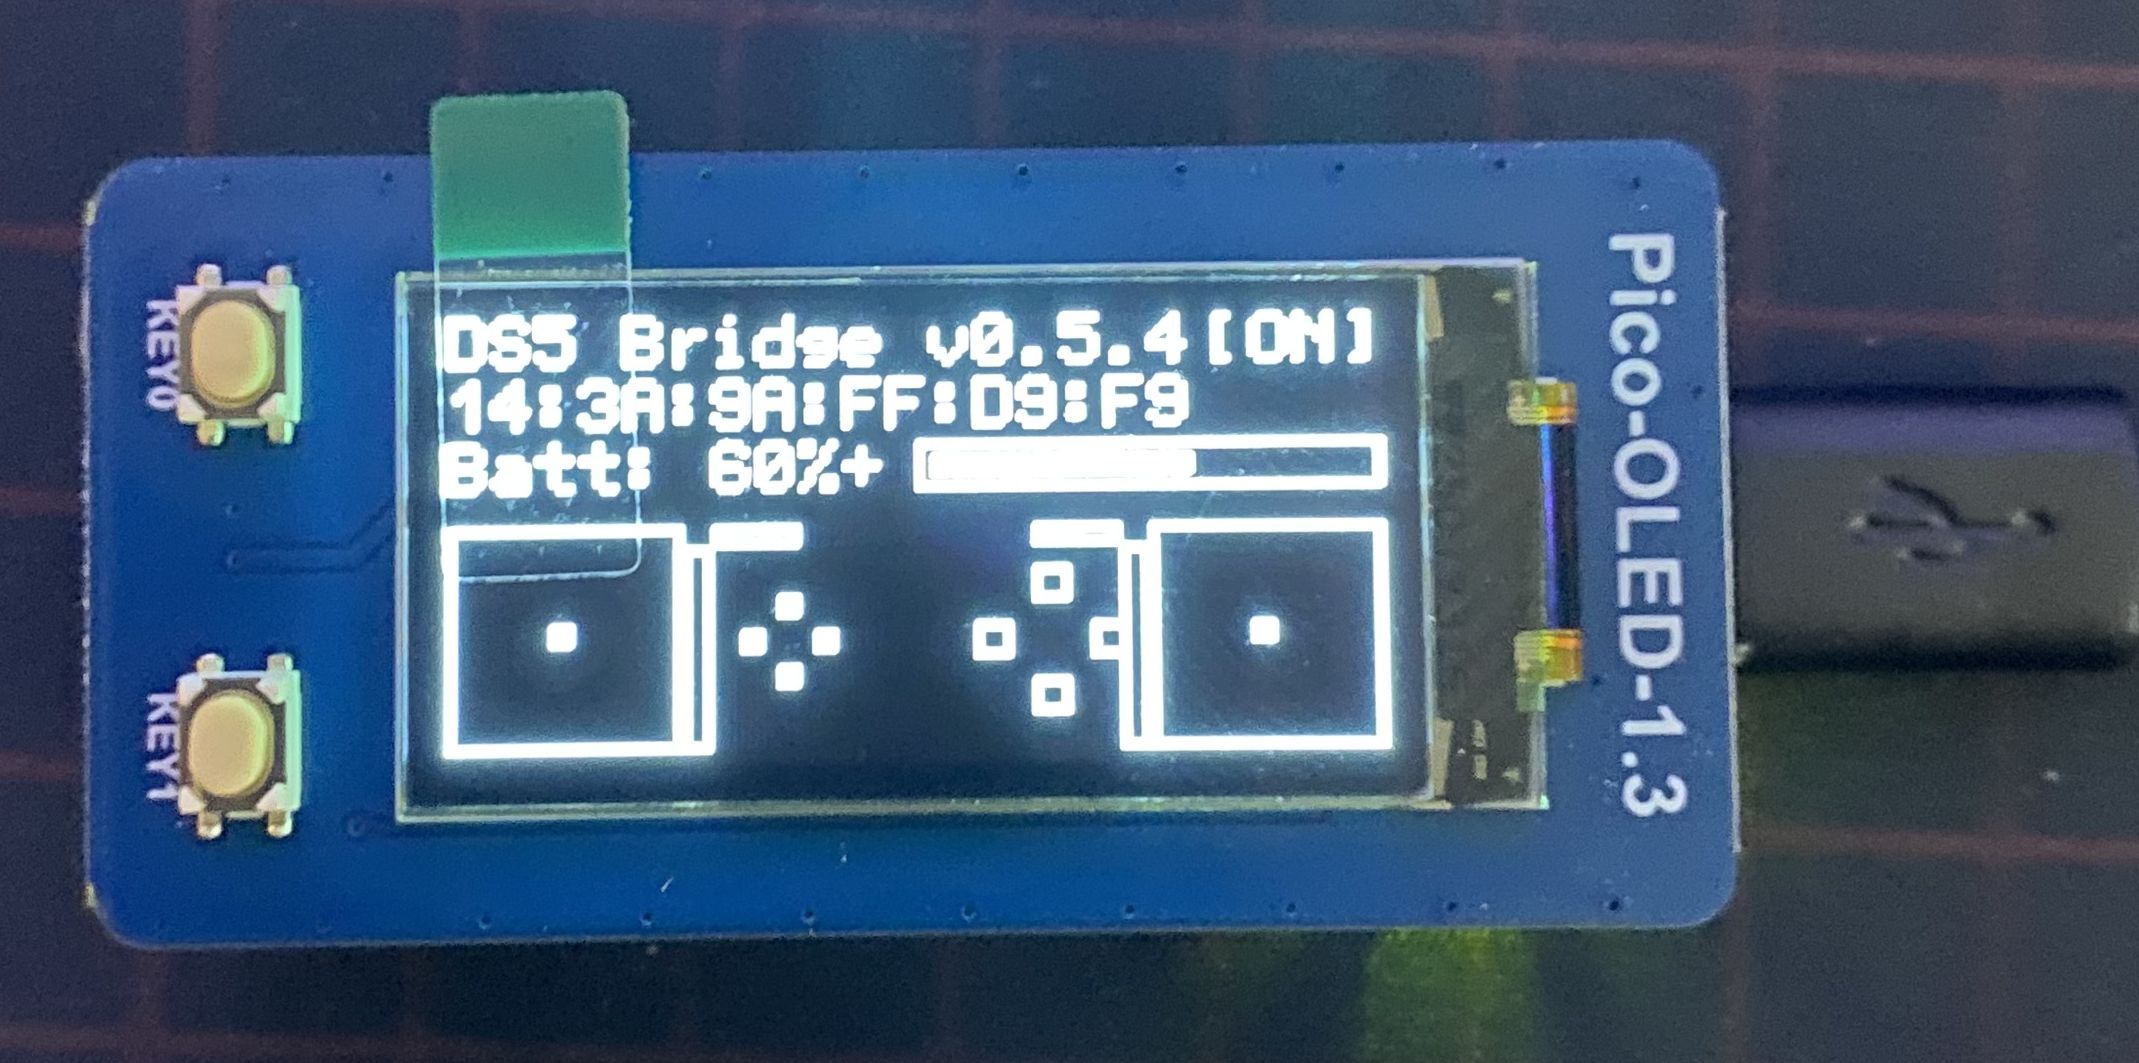
#### 1. Status
Connection state, paired DualSense BD address, battery % with bar (`+` charging / `*` complete / `!` error), live analog stick positions, D-pad, face buttons (△ ◯ ✕ □), L1/R1, and L2/R2 analog trigger fill bars. The link indicator and battery use small pixel icons.
```
┌──────────────────────────────┐
│ DS5 Bridge v0.5.4 ● │
│ 14:3A:9A:FF:D9:F9 │
│ 87%+ ╔══════════════╗ │
│ ║██████░░░░░░░░║▌ │
│ ┌────┐ L1 △ R1 ┌────┐│
│ │ ·• │ L2 ○ □ R2 │ ·• ││
│ │ │ ▌ ✕ ▌ │ ││
│ └────┘ └────┘│
└──────────────────────────────┘
```
 #### 2. Slots
Persistent 4-slot multi-controller pairing. Browse stored controllers, switch active slot, or wipe a single slot. `>` is the cursor, `*` marks the currently active slot.
```
┌──────────────────────────────┐
│ Slots [s0 ON] │
│ >0* 14:3A:9A:FF:D9:F9 │
│ 1 (empty) │
│ 2 (empty) │
│ 3 (empty) │
│ │
│ Tri=switch Sq hold=wipe │
└──────────────────────────────┘
```
- **D-pad ▲▼** — move cursor across slots 0–3
- **△** — switch to the cursor slot (disconnect current, reconnect to slot's stored controller)
- **□ hold 1.5 s** — wipe the cursor slot (drops bd_addr + BTstack link key)
- Active slot is persisted; the dongle reconnects to it on next boot
#### 3. Lightbar Color Picker
Tilt the controller on each axis to dial in R / G / B; the firmware sends the resulting color to the DualSense's actual lightbar at 10 Hz, so the lightbar IS the visual preview (the OLED is monochrome).
```
┌──────────────────────────────┐
│ Lightbar [LIVE] │
│ R:128 G: 77 B:200 │
│ ████░░░ ██░░░░░ ██████░░ │
│ (R) (G) (B) │
│ Sv: T=0 C=1 X=2 S=3 │
│ Tilt = R/G/B │
│ K0=next K1=cycle │
└──────────────────────────────┘
```
#### 2. Slots
Persistent 4-slot multi-controller pairing. Browse stored controllers, switch active slot, or wipe a single slot. `>` is the cursor, `*` marks the currently active slot.
```
┌──────────────────────────────┐
│ Slots [s0 ON] │
│ >0* 14:3A:9A:FF:D9:F9 │
│ 1 (empty) │
│ 2 (empty) │
│ 3 (empty) │
│ │
│ Tri=switch Sq hold=wipe │
└──────────────────────────────┘
```
- **D-pad ▲▼** — move cursor across slots 0–3
- **△** — switch to the cursor slot (disconnect current, reconnect to slot's stored controller)
- **□ hold 1.5 s** — wipe the cursor slot (drops bd_addr + BTstack link key)
- Active slot is persisted; the dongle reconnects to it on next boot
#### 3. Lightbar Color Picker
Tilt the controller on each axis to dial in R / G / B; the firmware sends the resulting color to the DualSense's actual lightbar at 10 Hz, so the lightbar IS the visual preview (the OLED is monochrome).
```
┌──────────────────────────────┐
│ Lightbar [LIVE] │
│ R:128 G: 77 B:200 │
│ ████░░░ ██░░░░░ ██████░░ │
│ (R) (G) (B) │
│ Sv: T=0 C=1 X=2 S=3 │
│ Tilt = R/G/B │
│ K0=next K1=cycle │
└──────────────────────────────┘
```
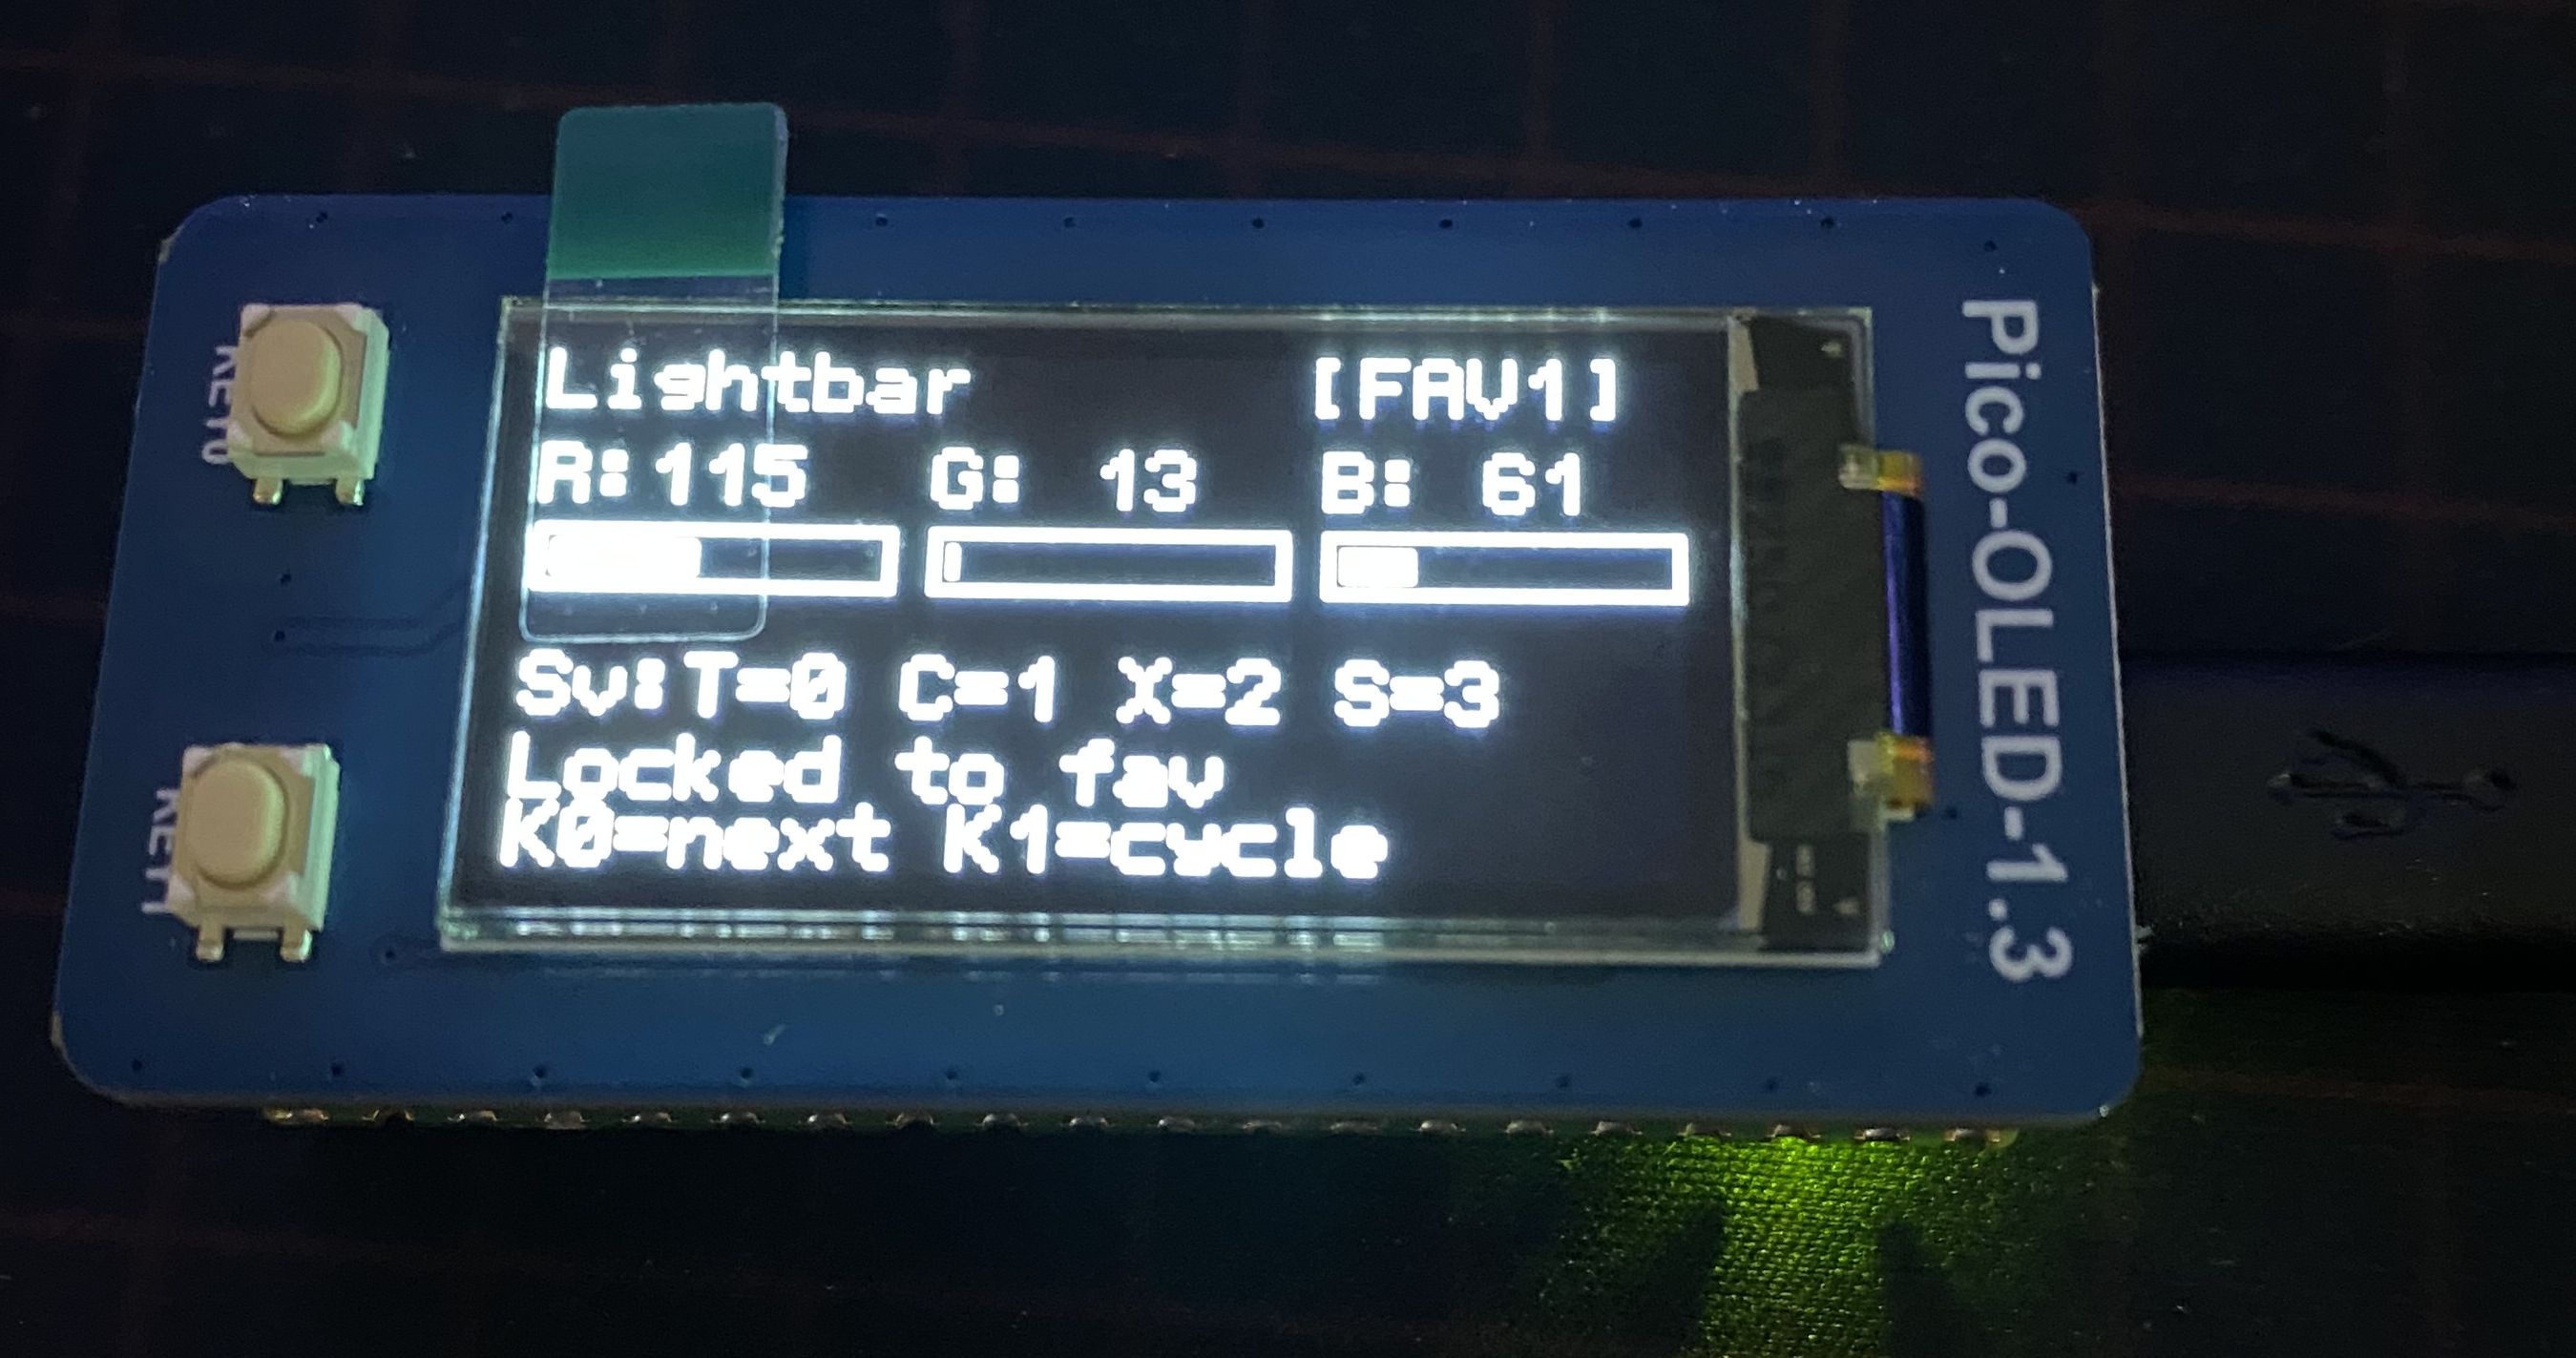 - Press **△ ◯ ✕ □** on the controller to **save** the current color into favorite slot 0 / 1 / 2 / 3
- Press **KEY1** to cycle the mode tag: `[LIVE]` → `[FAV0]` → `[FAV1]` → `[FAV2]` → `[FAV3]` → effects (Breathing / Rainbow / Fade) → back to `[LIVE]`
- Default favorites: Red, Green, Blue, White
#### 4. Trigger Test
KEY1 cycles seven adaptive trigger effects applied to both L2 and R2. Pull each trigger to feel the effect.
```
┌──────────────────────────────┐
│ Trigger Test │
│ Mode: Weapon │
│ L2: 127 R2: 42 │
│ │
│ ████░░░░░░ ██░░░░░░░░ │
│ (L2 pull) (R2 pull) │
│ │
│ K0=next K1=cycle │
└──────────────────────────────┘
```
- Press **△ ◯ ✕ □** on the controller to **save** the current color into favorite slot 0 / 1 / 2 / 3
- Press **KEY1** to cycle the mode tag: `[LIVE]` → `[FAV0]` → `[FAV1]` → `[FAV2]` → `[FAV3]` → effects (Breathing / Rainbow / Fade) → back to `[LIVE]`
- Default favorites: Red, Green, Blue, White
#### 4. Trigger Test
KEY1 cycles seven adaptive trigger effects applied to both L2 and R2. Pull each trigger to feel the effect.
```
┌──────────────────────────────┐
│ Trigger Test │
│ Mode: Weapon │
│ L2: 127 R2: 42 │
│ │
│ ████░░░░░░ ██░░░░░░░░ │
│ (L2 pull) (R2 pull) │
│ │
│ K0=next K1=cycle │
└──────────────────────────────┘
```
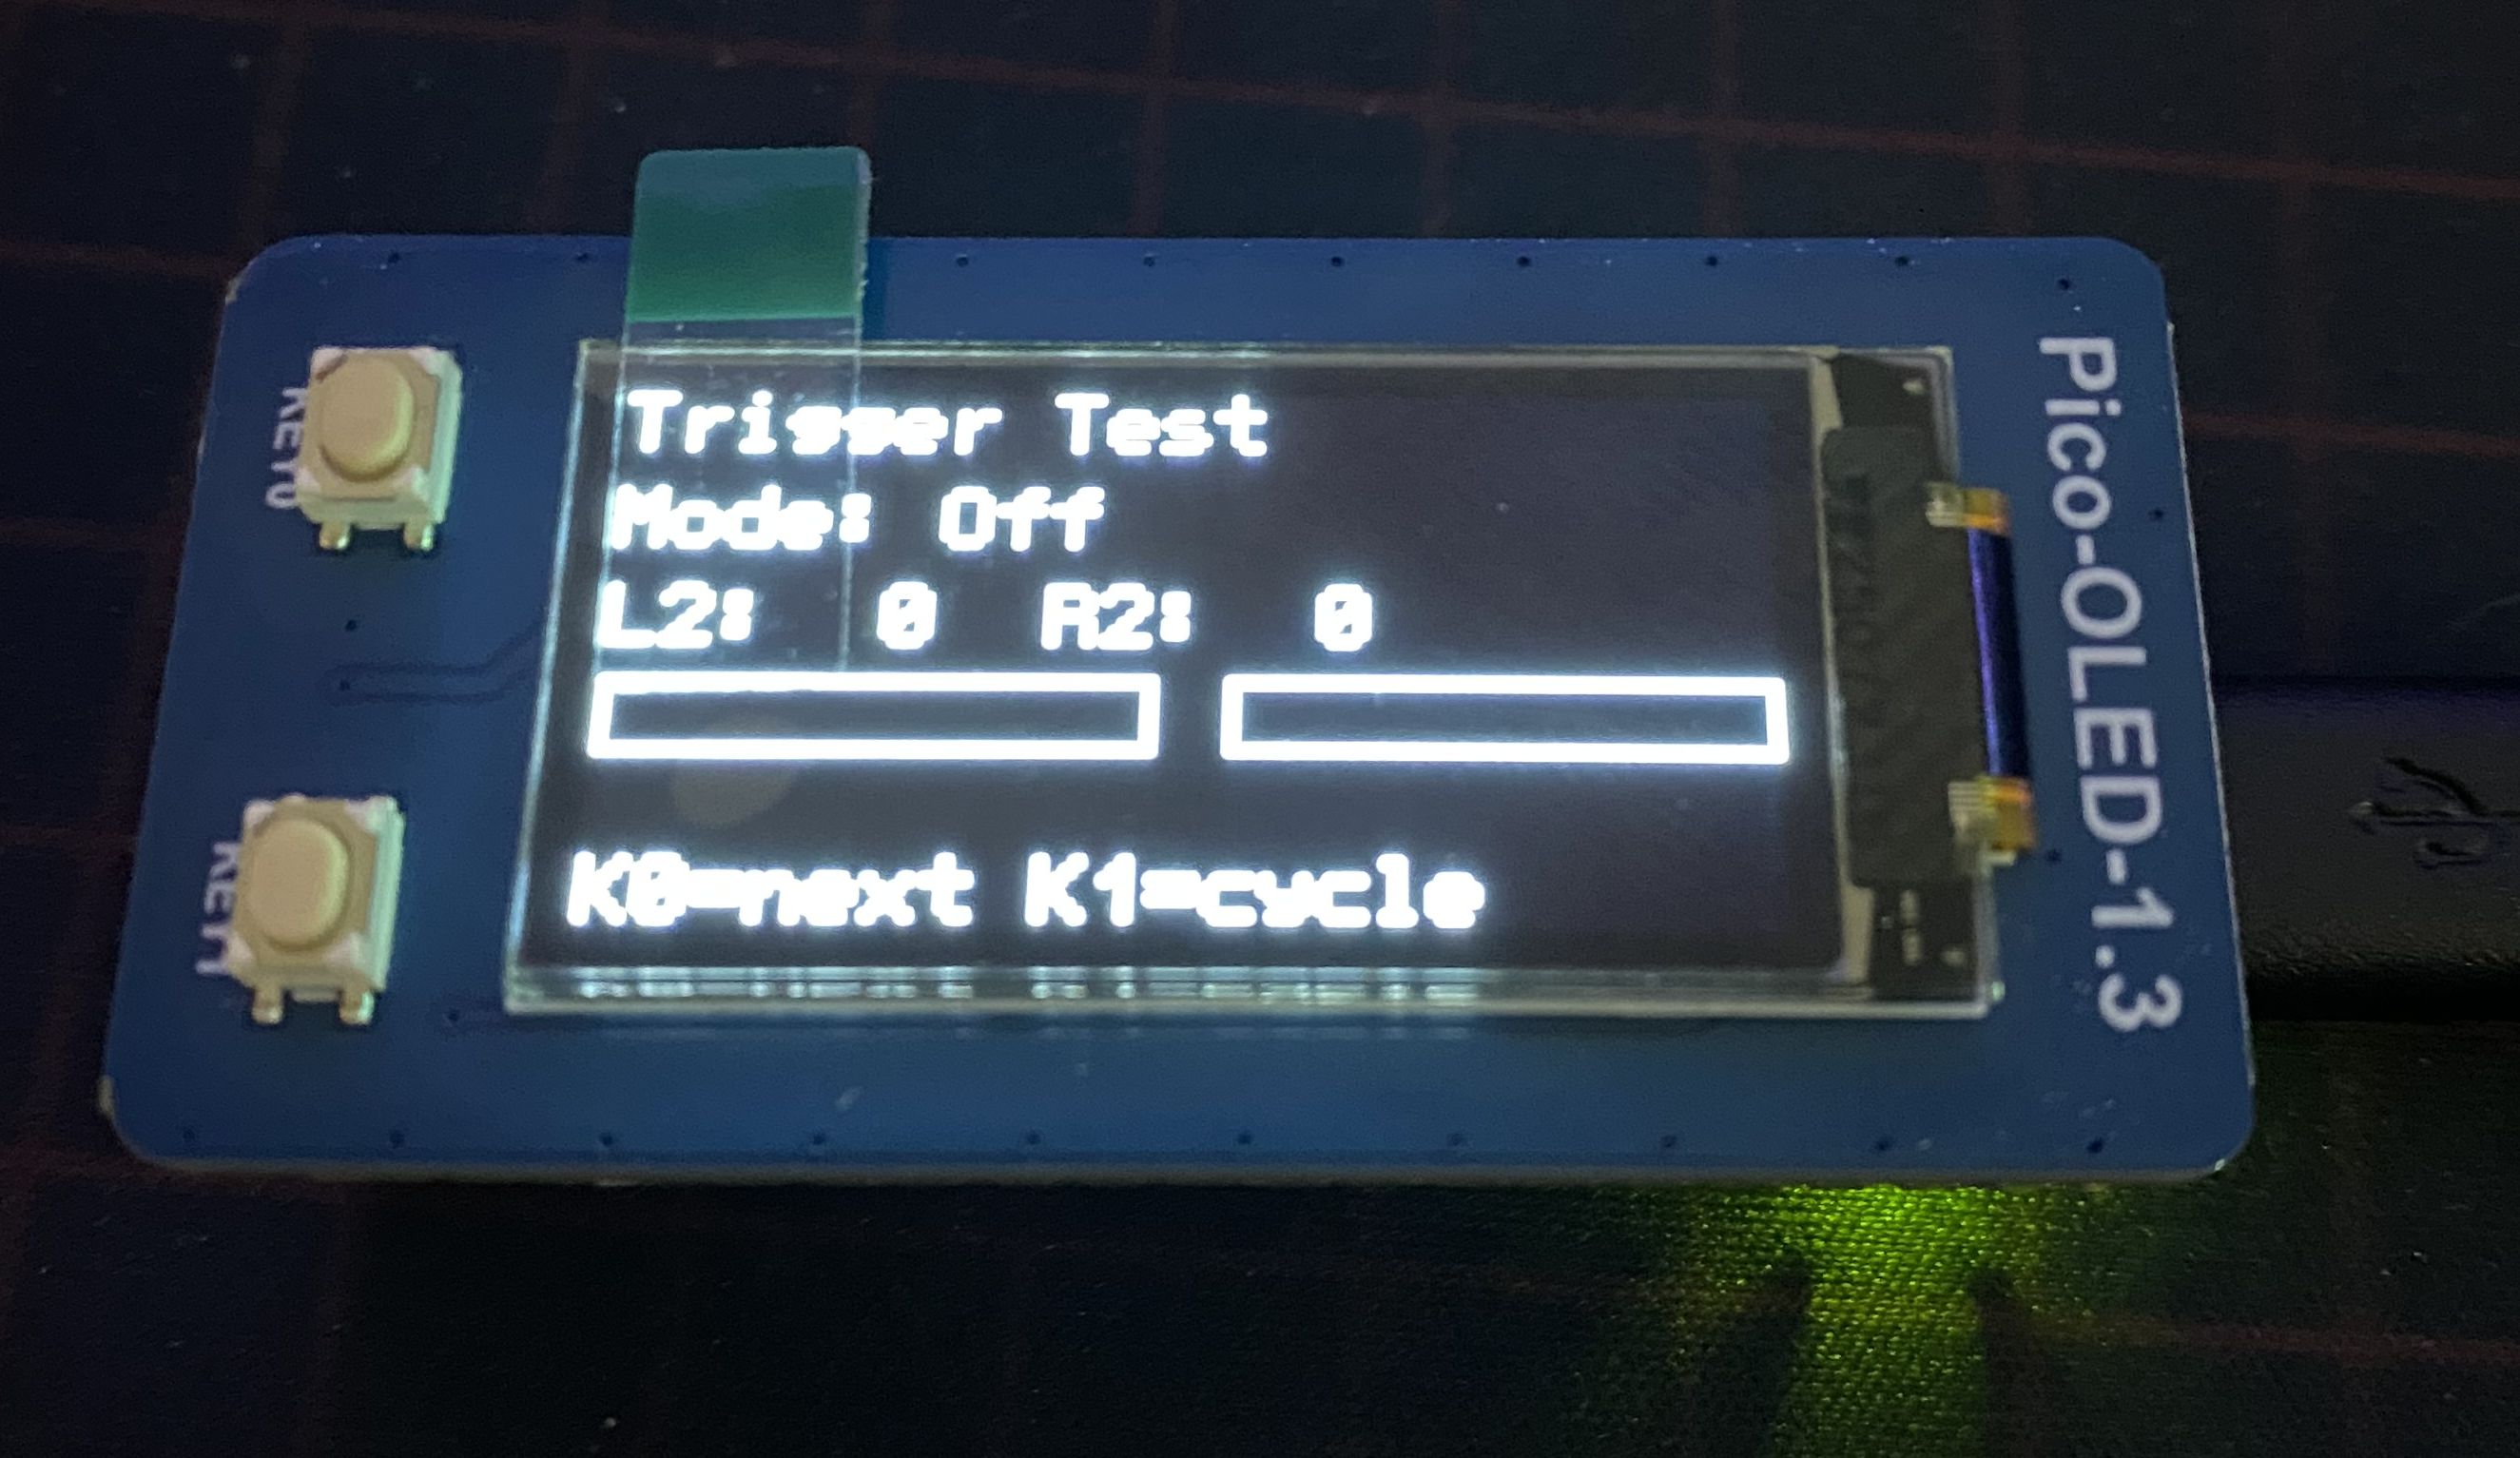 Cycle order: **Off → Feedback → Weapon → Vibration → Bow → Gallop → Machine Gun → Off …** Effect parameters bitpacked per [dualsensectl](https://github.com/nowrep/dualsensectl)'s reverse-engineering, all at max strength.
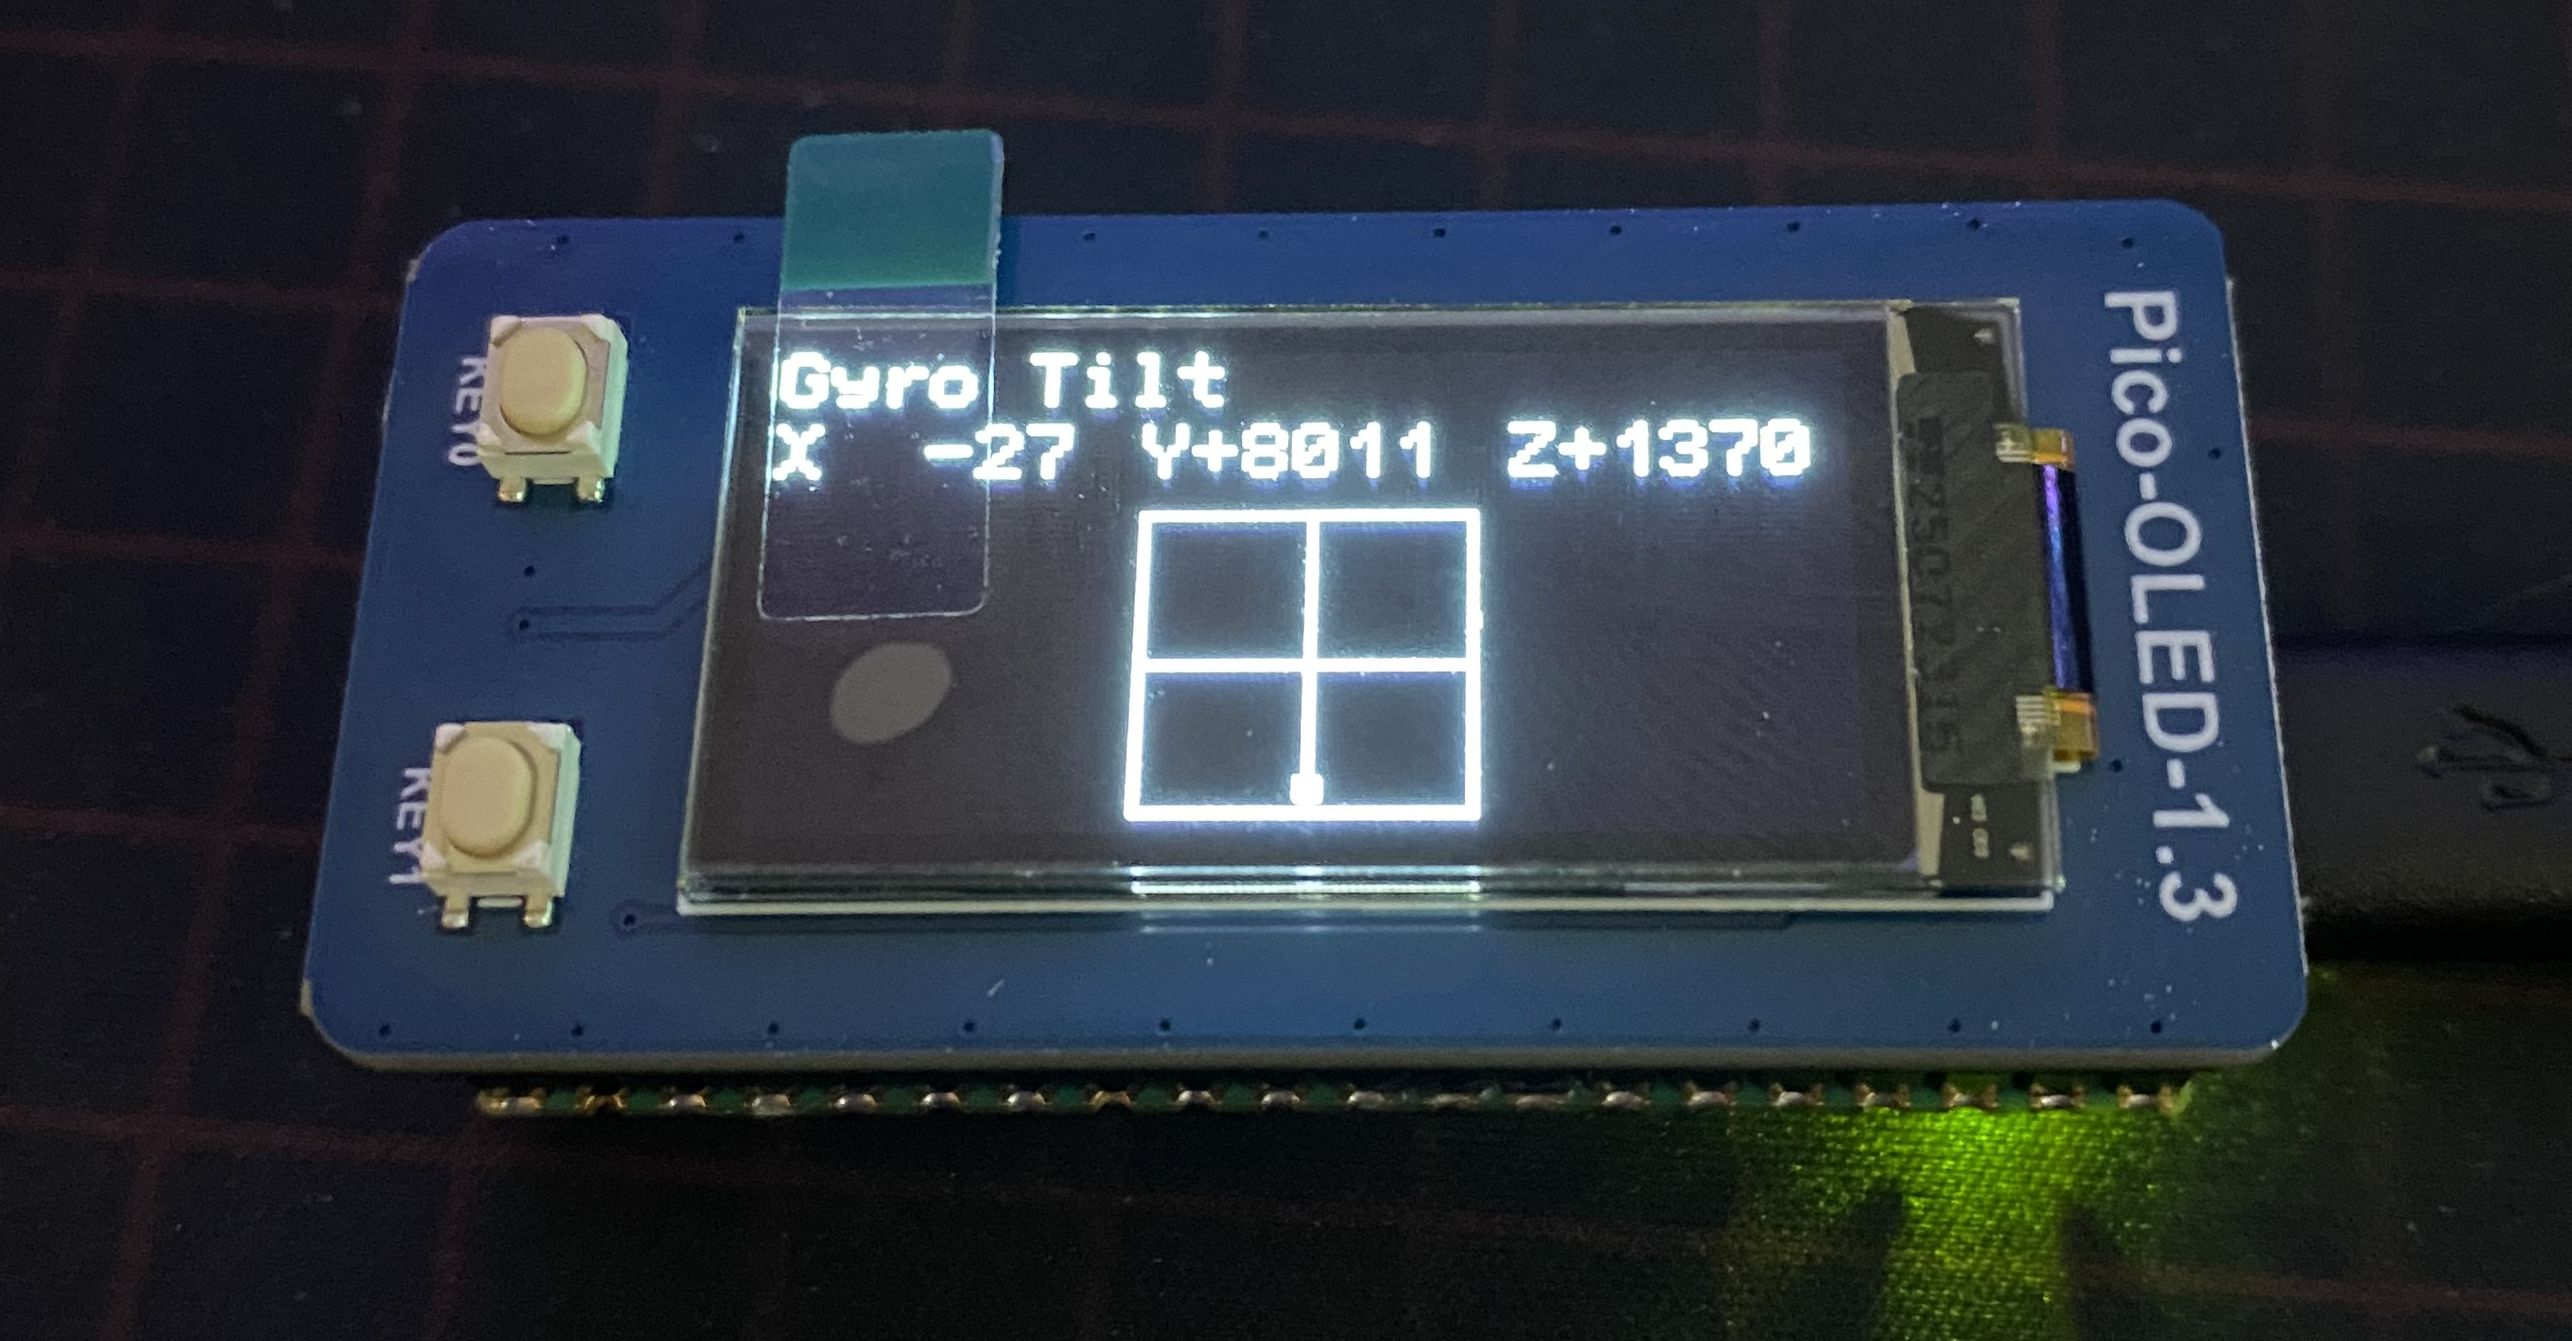
#### 5. Gyro Tilt
Live X/Y/Z accelerometer values with a 40×40 crosshair box. Tilt the controller and the dot tracks in real time.
```
┌──────────────────────────────┐
│ Gyro Tilt │
│ X +123 Y -456 Z +8123 │
│ ┌────────┐ │
│ │ │ │ │
│ │───•────│ │
│ │ │ │ │
│ └────────┘ │
└──────────────────────────────┘
```
Cycle order: **Off → Feedback → Weapon → Vibration → Bow → Gallop → Machine Gun → Off …** Effect parameters bitpacked per [dualsensectl](https://github.com/nowrep/dualsensectl)'s reverse-engineering, all at max strength.
#### 5. Gyro Tilt
Live X/Y/Z accelerometer values with a 40×40 crosshair box. Tilt the controller and the dot tracks in real time.
```
┌──────────────────────────────┐
│ Gyro Tilt │
│ X +123 Y -456 Z +8123 │
│ ┌────────┐ │
│ │ │ │ │
│ │───•────│ │
│ │ │ │ │
│ └────────┘ │
└──────────────────────────────┘
```
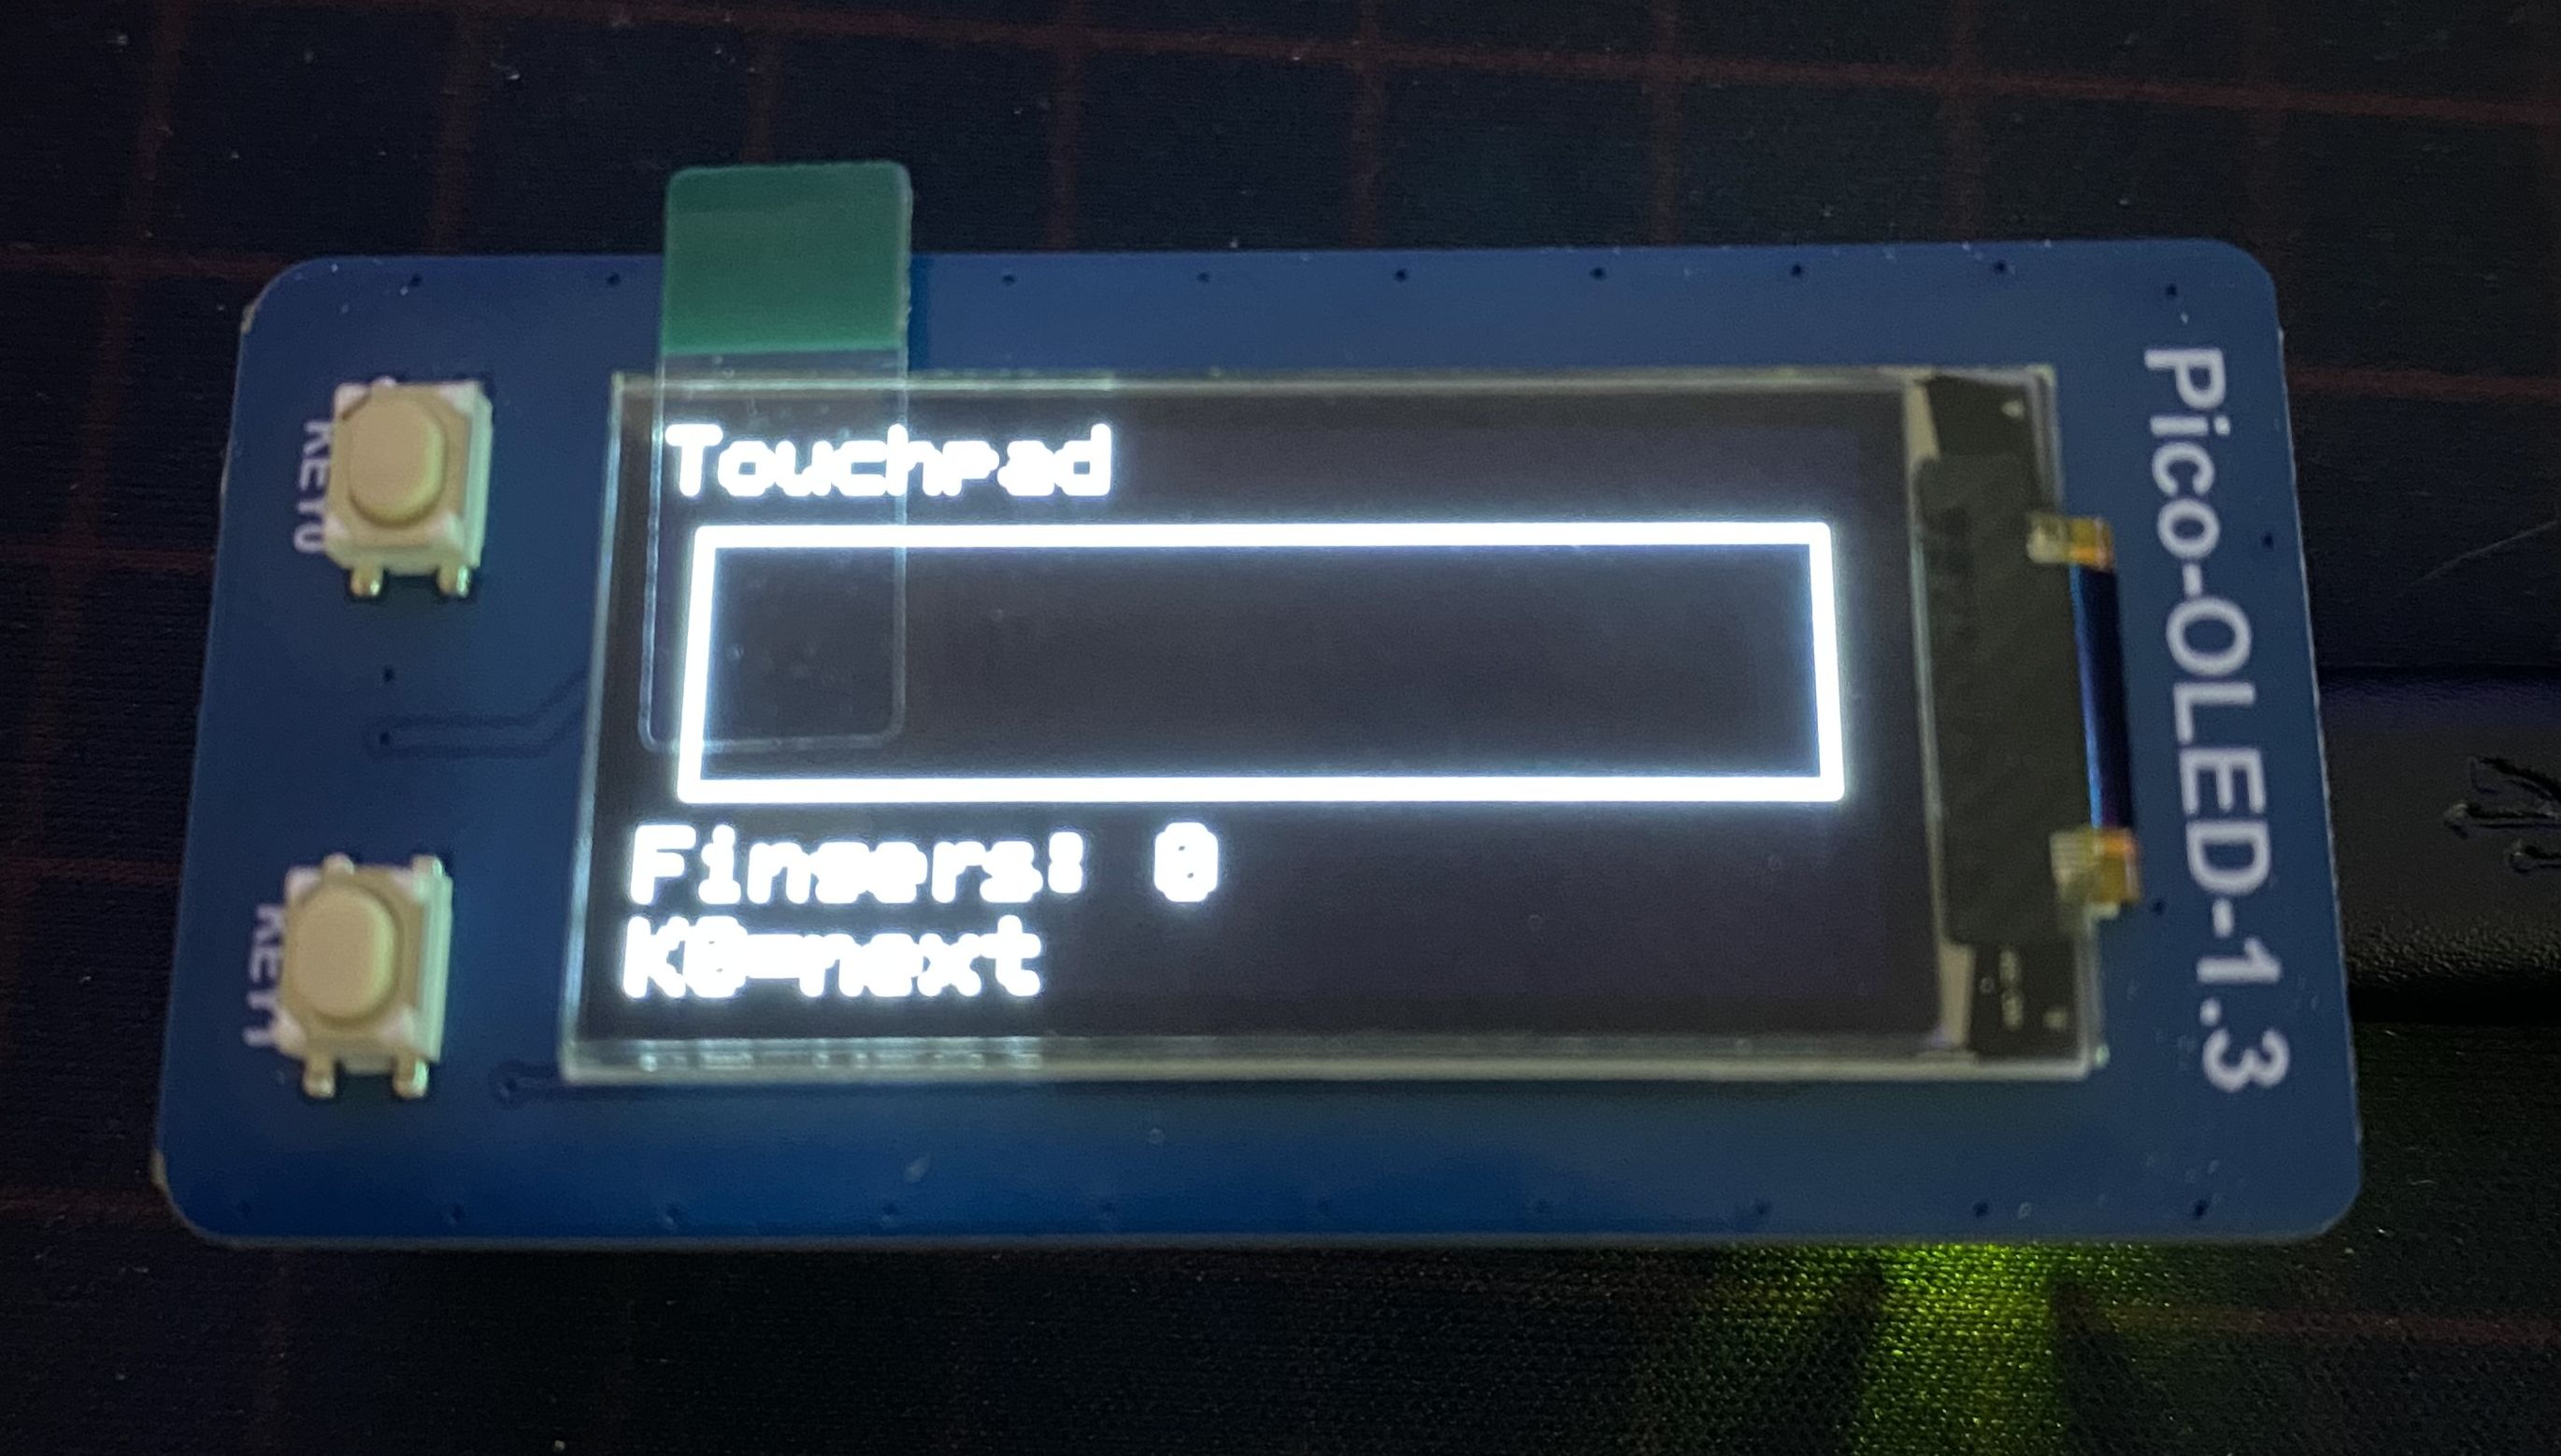
 #### 6. Touchpad
Live render of the touchpad surface. Dots appear at current finger positions; the count updates as fingers touch / leave.
```
┌──────────────────────────────┐
│ Touchpad │
│ ┌──────────────────────────┐ │
│ │ • • │ │
│ │ │ │
│ └──────────────────────────┘ │
│ Fingers: 2 │
│ │
│ K0=next │
└──────────────────────────────┘
```
#### 6. Touchpad
Live render of the touchpad surface. Dots appear at current finger positions; the count updates as fingers touch / leave.
```
┌──────────────────────────────┐
│ Touchpad │
│ ┌──────────────────────────┐ │
│ │ • • │ │
│ │ │ │
│ └──────────────────────────┘ │
│ Fingers: 2 │
│ │
│ K0=next │
└──────────────────────────────┘
```
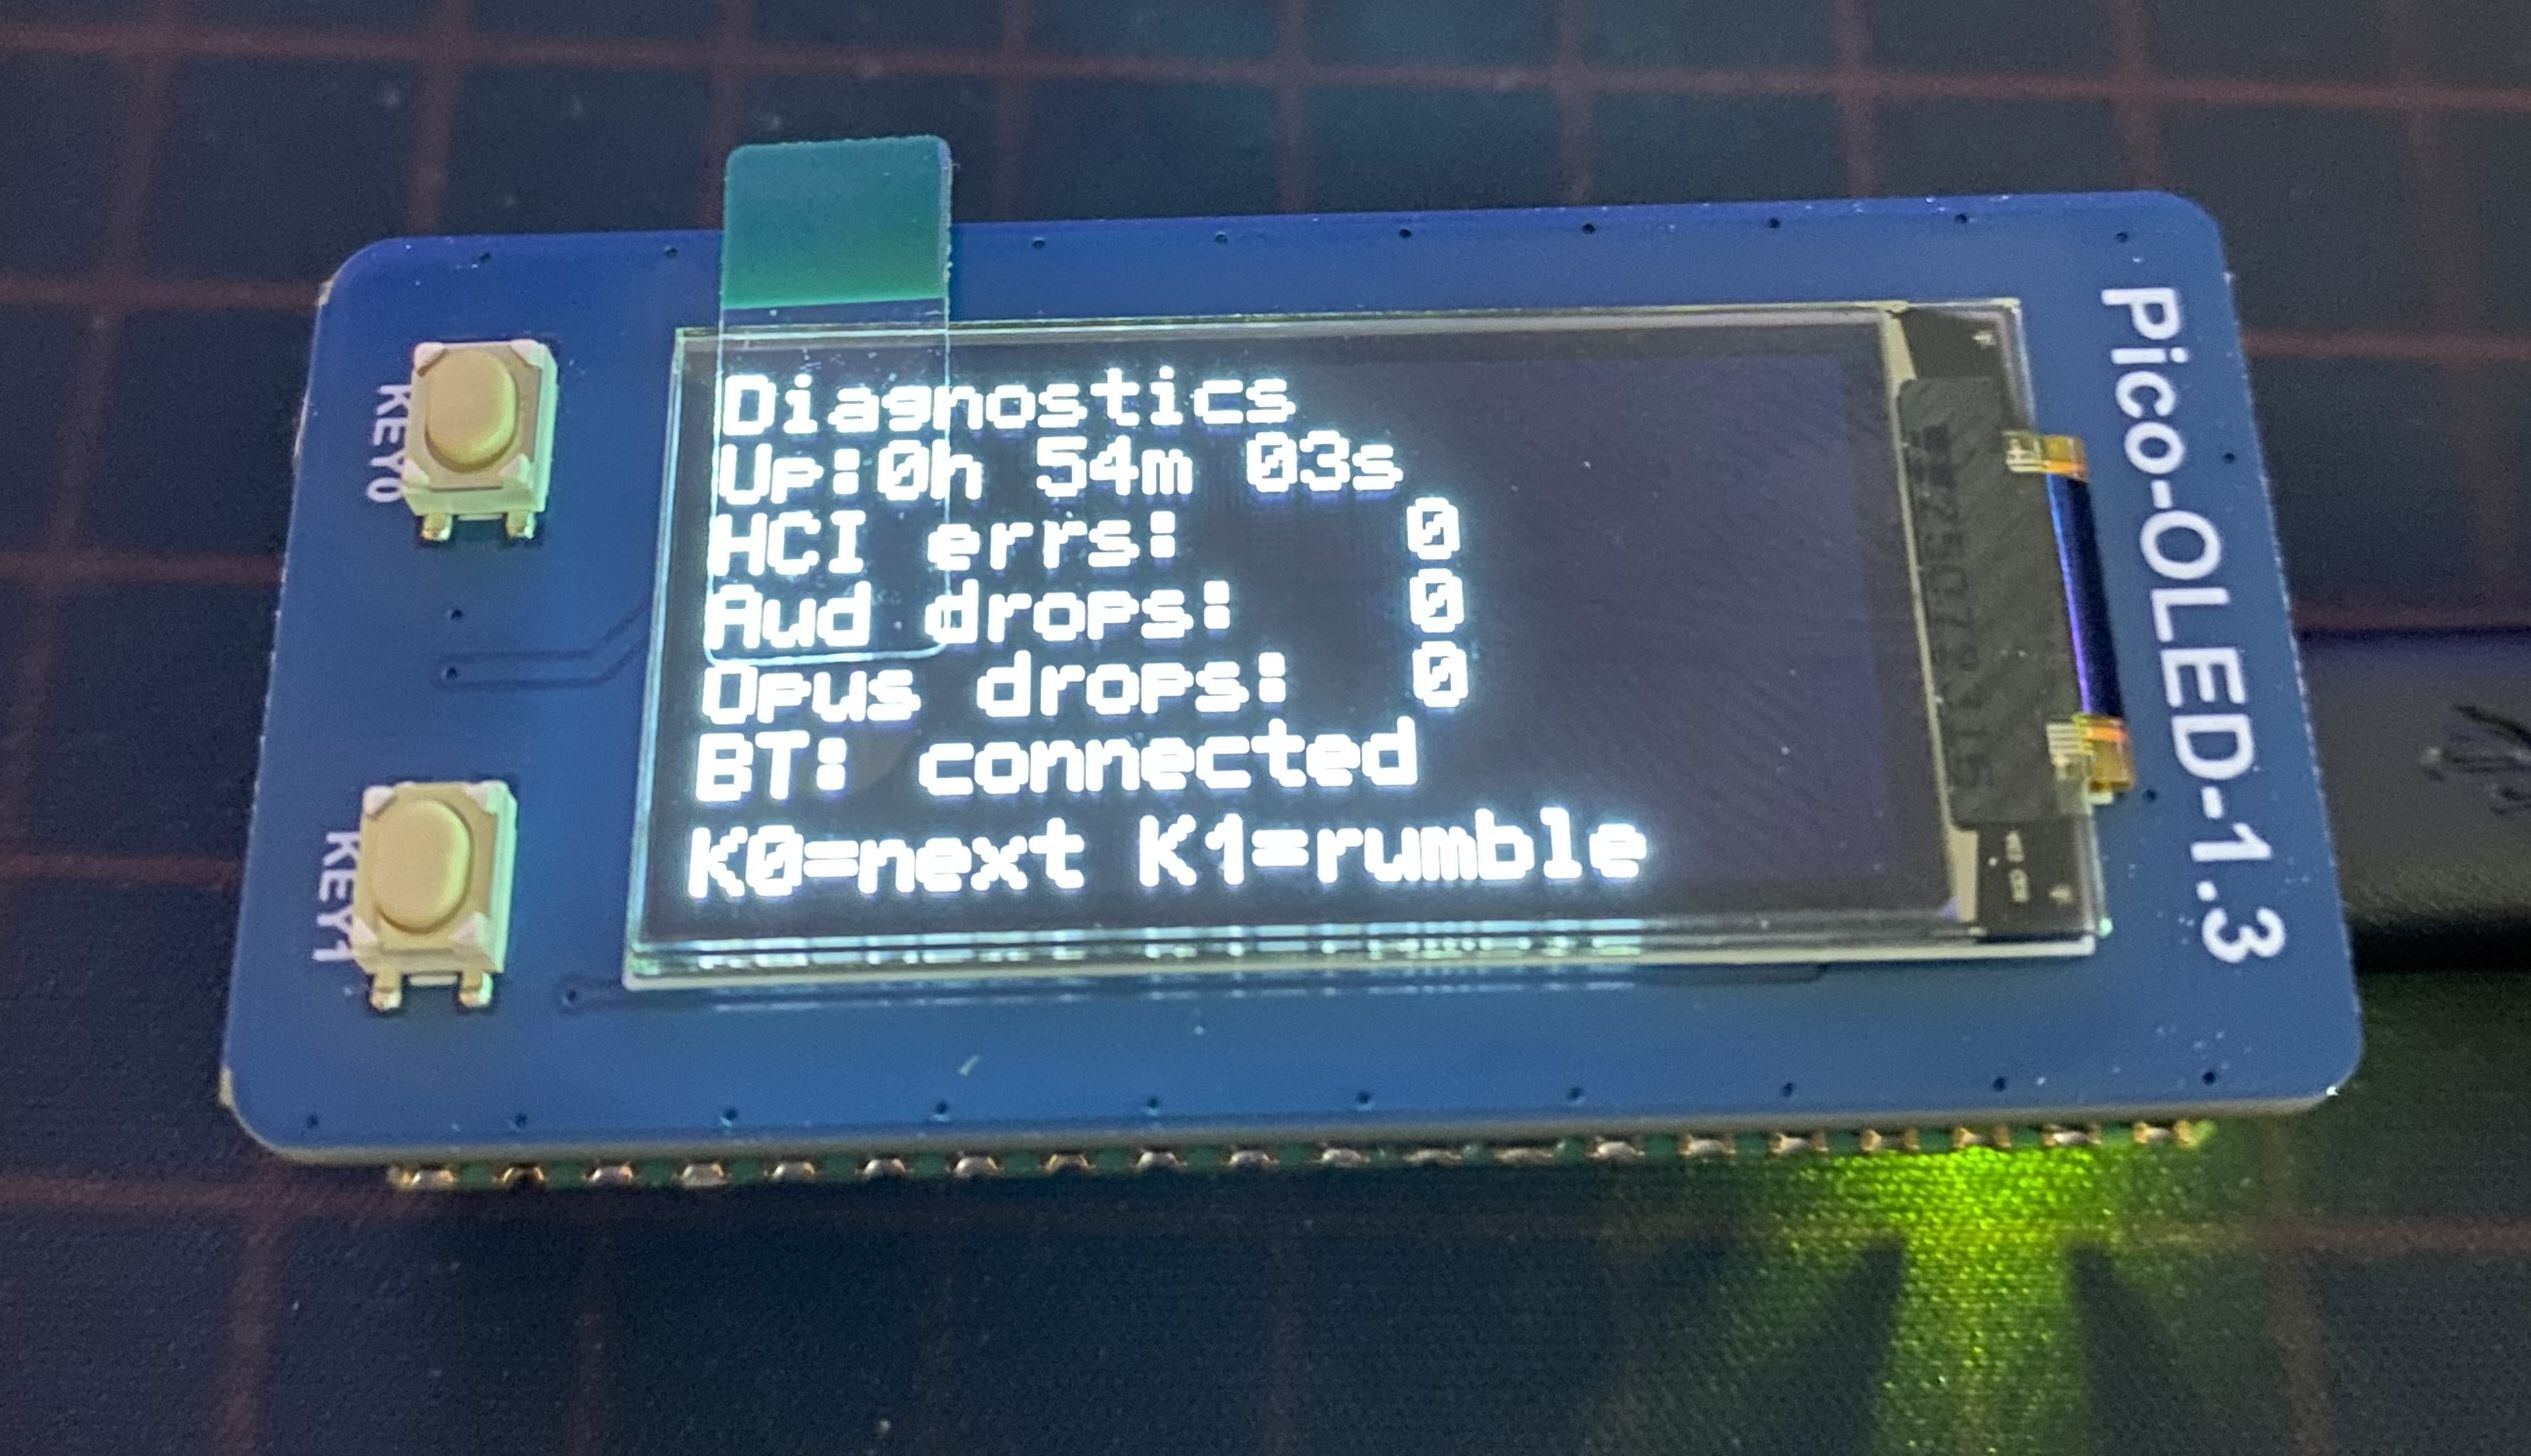
 #### 7. Diagnostics
Uptime, BT state, and stub counters for HCI errors / audio FIFO drops / opus FIFO drops (always 0 in this build — kept for future wiring).
```
┌──────────────────────────────┐
│ Diagnostics │
│ Up: 0h 14m 22s │
│ HCI errs: 0 │
│ Aud drops: 0 │
│ Opus drops: 0 │
│ BT: connected │
│ │
│ K0=next │
└──────────────────────────────┘
```
#### 7. Diagnostics
Uptime, BT state, and stub counters for HCI errors / audio FIFO drops / opus FIFO drops (always 0 in this build — kept for future wiring).
```
┌──────────────────────────────┐
│ Diagnostics │
│ Up: 0h 14m 22s │
│ HCI errs: 0 │
│ Aud drops: 0 │
│ Opus drops: 0 │
│ BT: connected │
│ │
│ K0=next │
└──────────────────────────────┘
```
 #### 8. RSSI
Live Bluetooth signal strength of the active link, in dBm with a bar. Closer to 0 dBm is stronger; −90 dBm is weak.
#### 9. VU Meters
Live peak meters for the speaker and haptic audio paths. Useful for verifying audio routing without the controller being plugged in to a host.
#### 10. Settings
Persistent config editor. D-pad ▲▼ moves the selection, ▶◀ adjusts values, △ saves to flash. Includes the 8 firmware-config fields (haptics gain, speaker volume, inactive timeout, etc.), the Audio Auto Haptics controls, and two hold-to-confirm actions:
- **AutoHap Off / Fallback / Mix / Replace** — selects the Audio Auto Haptics mode. Default `Fallback` fires derived rumble only when the game sends no native haptic data (e.g. Ghost of Tsushima on Linux); games that *do* send native haptics (Spider-Man Remastered) pass through unchanged. `Mix` adds derived on top of native, `Replace` ignores native entirely, `Off` disables.
- **AH Gain N%** — derived-signal gain, 0–200 % in 10 % steps. Default 100 %.
- **AH LP 80/160/250/400 Hz** — low-pass cutoff applied to the speaker audio before envelope follow. Lower = more sub-bass, higher = more presence. Default 160 Hz.
- **Reset to defaults** — hold △ for 2 s to revert all config fields
- **Wipe all slots** — hold △ for 2 s to drop all 4 paired controllers + all BTstack link keys
### KEY1 behavior by screen
| Screen | KEY1 short-press action |
|---|---|
| Status, Slots, Gyro Tilt, Touchpad, Diagnostics, RSSI, VU Meters, Settings | Step **backward** one screen (mirror of KEY0's forward step) |
| Trigger Test | Cycle the trigger effect preset |
| Lightbar Color Picker | Cycle between LIVE preview, the 4 favorite slots, and the effect presets |
KEY1 long-press (≥1.5 s) on any screen cycles the OLED brightness level.
### Pinout (standard Waveshare Pico HAT layout)
| Function | GPIO |
|---|---|
| MOSI | 11 |
| SCK | 10 |
| CS | 9 |
| DC | 8 |
| RST | 12 |
| KEY0 | 15 |
| KEY1 | 17 |
### Soft-reboot recovery
Two ways to reboot the dongle without unplugging USB — handy if pairing gets stuck or you want a clean state:
- **OLED KEY0 double-click** within ~400 ms → `watchdog_reboot`
- **DualSense `PS + Mute` held for 2 seconds** → `watchdog_reboot` (works whether or not the OLED is attached)
## Acknowledgements
Some features and design ideas in this fork are borrowed from other forks of upstream, with credit:
- **[zurce/DS5Dongle-OLED](https://github.com/zurce/DS5Dongle-OLED)** — pixel-art icons in the OLED status header (visual approach), the "hold for factory reset" UX pattern used by the Settings screen's "Reset to defaults" item (hold △ for 2 s to confirm), and the multi-slot persistent BT pairing system on the new Slots screen (4 bonded controllers, D-pad to navigate, △ to switch slots, □ hold to wipe a slot, plus "Wipe all slots" in the Settings menu).
- **[loteran/DS5Dongle](https://github.com/loteran/DS5Dongle)** — independent rediscovery of the upstream `3a31bd7` regression that broke speaker / HD haptic output (commit `c7a8d3c`); the fix in our `src/audio.cpp` restores the same SetStateData sub-report. Also the source of the Audio Auto Haptics DSP (1-pole LP + envelope follower, see Settings → Auto Haptics) and the "don't sync USB-side UAC1 volume to the persistent config" fix.
- **[awalol/ds5dongle-config-web](https://github.com/awalol/ds5dongle-config-web)** — base for our forked web config app at [MarcelineVPQ/DS5Dongle-OLED-Config-Web](https://github.com/MarcelineVPQ/DS5Dongle-OLED-Config-Web). The fork adapts upstream's 13-byte Config_body layout to our 19-byte one and adds UI for our additions (multi-slot pairing, Auto Haptics).
## Roadmap
- Please check out [DS5Dongle plan](https://github.com/users/awalol/projects/5)
## Community
- Join the Discord server: [Discord Server](https://discord.gg/hM4ntchGCa)
- If you have a bug, please open an issue instead.
## References
- [rafaelvaloto/Pico_W-Dualsense](https://github.com/rafaelvaloto/Pico_W-Dualsense) — Project inspiration
- [egormanga/SAxense](https://github.com/egormanga/SAxense) — Bluetooth Haptics POC
- [https://controllers.fandom.com/wiki/Sony_DualSense](https://controllers.fandom.com/wiki/Sony_DualSense) - DualSense data report structure documentation
- [Paliverse/DualSenseX](https://github.com/Paliverse/DualSenseX) — Speaker report packet
#### 8. RSSI
Live Bluetooth signal strength of the active link, in dBm with a bar. Closer to 0 dBm is stronger; −90 dBm is weak.
#### 9. VU Meters
Live peak meters for the speaker and haptic audio paths. Useful for verifying audio routing without the controller being plugged in to a host.
#### 10. Settings
Persistent config editor. D-pad ▲▼ moves the selection, ▶◀ adjusts values, △ saves to flash. Includes the 8 firmware-config fields (haptics gain, speaker volume, inactive timeout, etc.), the Audio Auto Haptics controls, and two hold-to-confirm actions:
- **AutoHap Off / Fallback / Mix / Replace** — selects the Audio Auto Haptics mode. Default `Fallback` fires derived rumble only when the game sends no native haptic data (e.g. Ghost of Tsushima on Linux); games that *do* send native haptics (Spider-Man Remastered) pass through unchanged. `Mix` adds derived on top of native, `Replace` ignores native entirely, `Off` disables.
- **AH Gain N%** — derived-signal gain, 0–200 % in 10 % steps. Default 100 %.
- **AH LP 80/160/250/400 Hz** — low-pass cutoff applied to the speaker audio before envelope follow. Lower = more sub-bass, higher = more presence. Default 160 Hz.
- **Reset to defaults** — hold △ for 2 s to revert all config fields
- **Wipe all slots** — hold △ for 2 s to drop all 4 paired controllers + all BTstack link keys
### KEY1 behavior by screen
| Screen | KEY1 short-press action |
|---|---|
| Status, Slots, Gyro Tilt, Touchpad, Diagnostics, RSSI, VU Meters, Settings | Step **backward** one screen (mirror of KEY0's forward step) |
| Trigger Test | Cycle the trigger effect preset |
| Lightbar Color Picker | Cycle between LIVE preview, the 4 favorite slots, and the effect presets |
KEY1 long-press (≥1.5 s) on any screen cycles the OLED brightness level.
### Pinout (standard Waveshare Pico HAT layout)
| Function | GPIO |
|---|---|
| MOSI | 11 |
| SCK | 10 |
| CS | 9 |
| DC | 8 |
| RST | 12 |
| KEY0 | 15 |
| KEY1 | 17 |
### Soft-reboot recovery
Two ways to reboot the dongle without unplugging USB — handy if pairing gets stuck or you want a clean state:
- **OLED KEY0 double-click** within ~400 ms → `watchdog_reboot`
- **DualSense `PS + Mute` held for 2 seconds** → `watchdog_reboot` (works whether or not the OLED is attached)
## Acknowledgements
Some features and design ideas in this fork are borrowed from other forks of upstream, with credit:
- **[zurce/DS5Dongle-OLED](https://github.com/zurce/DS5Dongle-OLED)** — pixel-art icons in the OLED status header (visual approach), the "hold for factory reset" UX pattern used by the Settings screen's "Reset to defaults" item (hold △ for 2 s to confirm), and the multi-slot persistent BT pairing system on the new Slots screen (4 bonded controllers, D-pad to navigate, △ to switch slots, □ hold to wipe a slot, plus "Wipe all slots" in the Settings menu).
- **[loteran/DS5Dongle](https://github.com/loteran/DS5Dongle)** — independent rediscovery of the upstream `3a31bd7` regression that broke speaker / HD haptic output (commit `c7a8d3c`); the fix in our `src/audio.cpp` restores the same SetStateData sub-report. Also the source of the Audio Auto Haptics DSP (1-pole LP + envelope follower, see Settings → Auto Haptics) and the "don't sync USB-side UAC1 volume to the persistent config" fix.
- **[awalol/ds5dongle-config-web](https://github.com/awalol/ds5dongle-config-web)** — base for our forked web config app at [MarcelineVPQ/DS5Dongle-OLED-Config-Web](https://github.com/MarcelineVPQ/DS5Dongle-OLED-Config-Web). The fork adapts upstream's 13-byte Config_body layout to our 19-byte one and adds UI for our additions (multi-slot pairing, Auto Haptics).
## Roadmap
- Please check out [DS5Dongle plan](https://github.com/users/awalol/projects/5)
## Community
- Join the Discord server: [Discord Server](https://discord.gg/hM4ntchGCa)
- If you have a bug, please open an issue instead.
## References
- [rafaelvaloto/Pico_W-Dualsense](https://github.com/rafaelvaloto/Pico_W-Dualsense) — Project inspiration
- [egormanga/SAxense](https://github.com/egormanga/SAxense) — Bluetooth Haptics POC
- [https://controllers.fandom.com/wiki/Sony_DualSense](https://controllers.fandom.com/wiki/Sony_DualSense) - DualSense data report structure documentation
- [Paliverse/DualSenseX](https://github.com/Paliverse/DualSenseX) — Speaker report packet